Stop asking Google How To Use X (Formerly Twitter) For Blogging? or Is Twitter good for blogging? YES! These are a few of my Formulas for How to Use Twitter to Drive Traffic to Your Blog! And it all starts with getting set up! Here’s How To Set Up An X Account (formerly Twitter) for your blog!
If you’ve been wondering “How to Use Twitter (Now X)” then this is a Step-By-Step Guide to help you answering everything you need to know from “How do I create a Twitter account for my blog? to What is the best way to promote your blog on Twitter?”
By the end of this you’ll know What type of blogging platform is Twitter? How to Share Blogger Posts on X (formerly Twitter), and solve the bigger mystery of How to use Twitter to drive more traffic to my blog? This is exactly How I Set Up Twitter For My Blog…
- Name UserName & Handle:
- Profile Pic
- Add Header
- Bio
- Location (optional)
- Website
i.e. add a Profile Pic, Header, Bio, Location (optional), Website or some other type of URL etc… Once you’re in you’re profile you should see a tab to “edit profile” and be able to add all of these things.
Another social media platform I set up an account on and one of the most underrated is Twitter (now X) — which is ESSENTIAL for my BLOG since it’s mainly a text-based communication platform, easy to use and Not to mention great for backlinks!
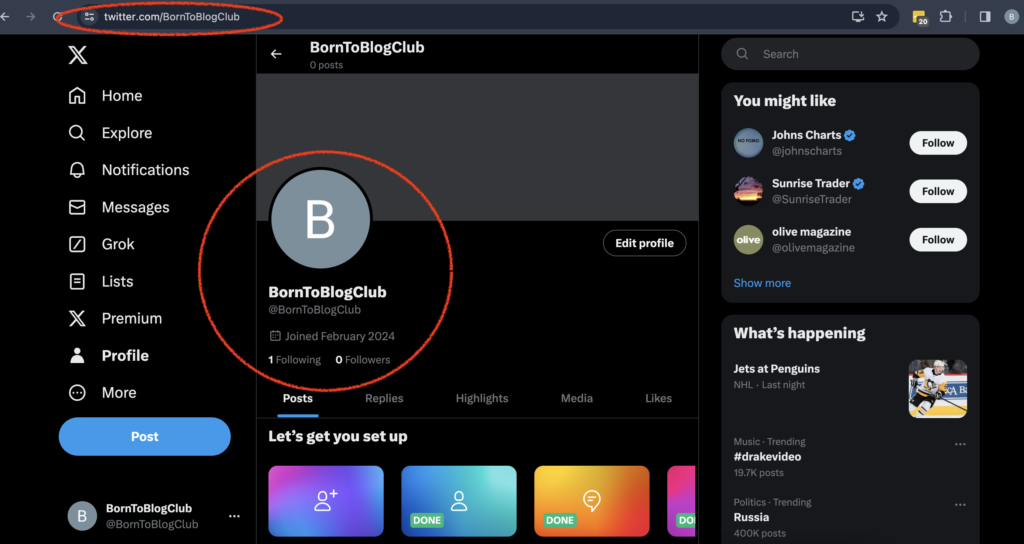
User Name & Handle “@”
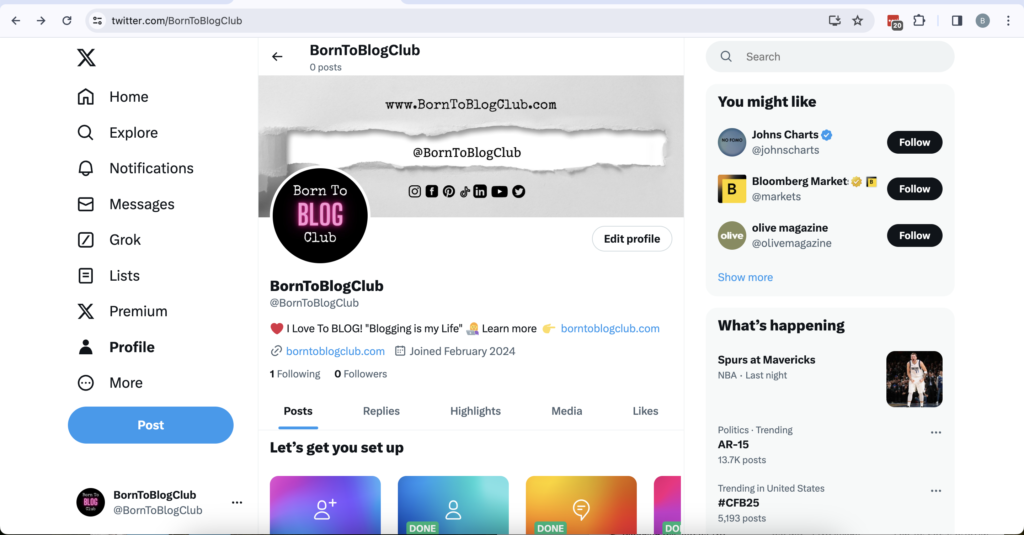
For Twitter, I set up the username and handle to be @BornToBlogClub so people can find me via https://x.com/BornToBlogClub plus it would match all the other social media accounts and make my brand look uniform.
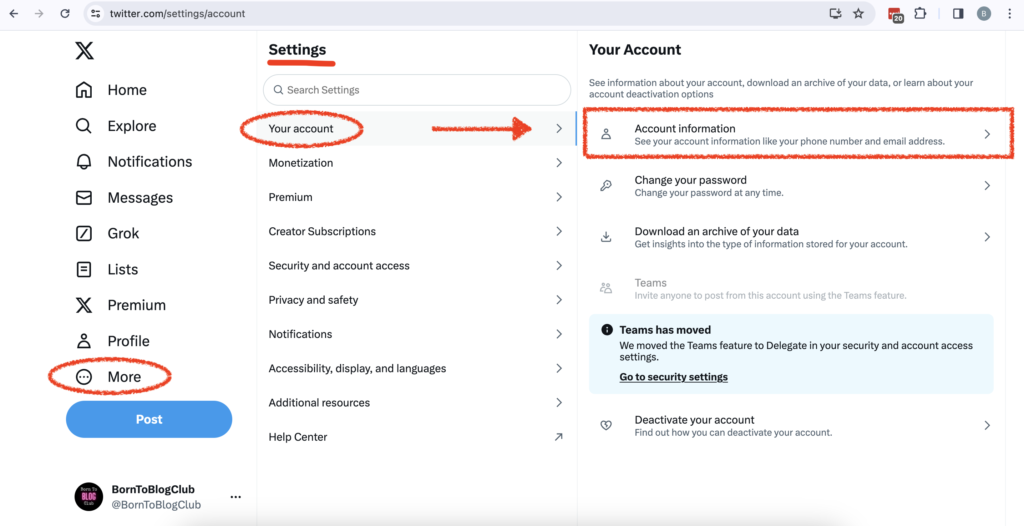
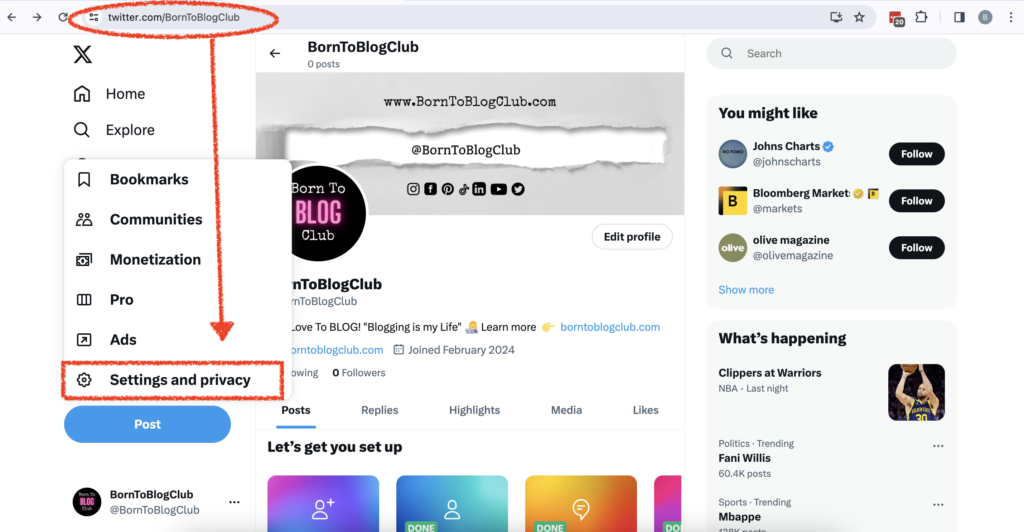
Usually, when you sign up for a Twitter account it will ask you for a username which will end up being your “@” handle BUT if it’s not then you’ll want to update it! To update your X (Twitter) username you’ll want to navigate to your settings. You might see a tab that says “More…” or you can go to https://twitter.com/settings/account and make the needed changes under “Your Account Information”
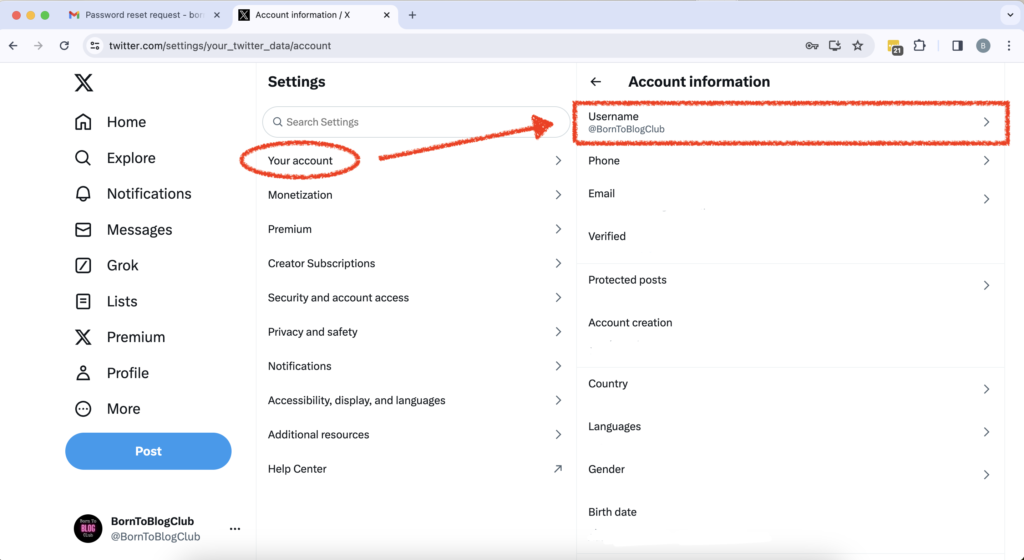
I will usually come back to update it later i.e. add the headers, profile pic, bio, etc… all at the same time… as we did in a prior post showing “How I Set Up All My Social Media Accounts For My BLOG” (the RIGHT way)!
Customize Your Profile
After setting up your Twitter (now X) account and securing the social media handle. You’ll want to be sure to come back and customize your profile at some point, hopefully before you make your post! i.e. add a Profile Pic, Header, Bio, Location (optional), Website or some other type of URL etc… Once you’re in you’re profile you should see a tab to “edit profile” and be able to add all of these things.
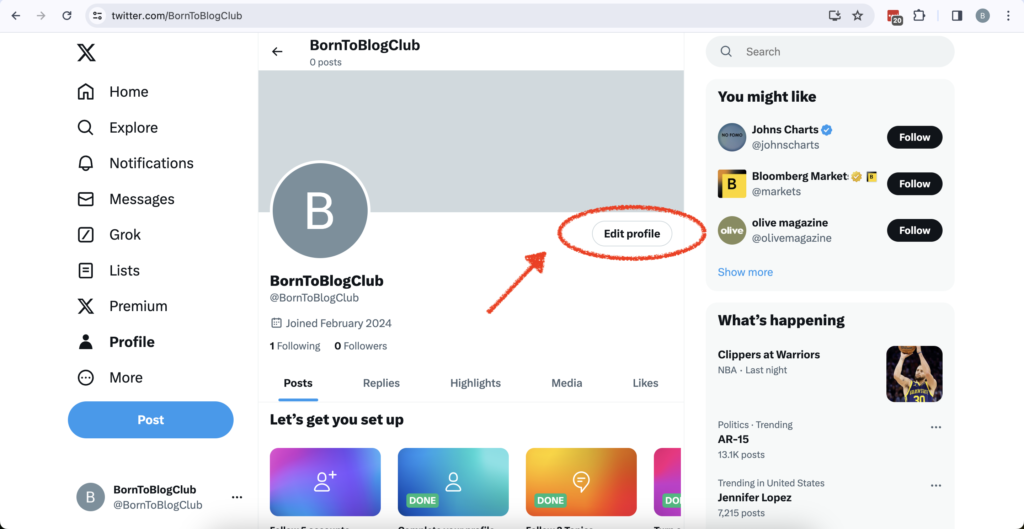
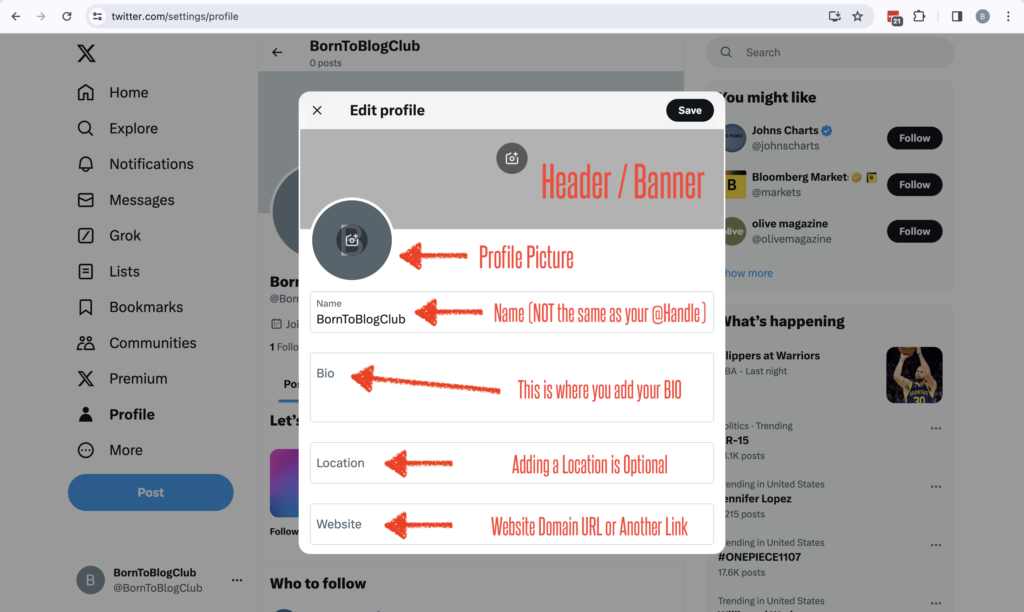
User Name & Handle
The User Name and Handle is Different than the “Name” or it CAN BE different if you want it to be meaning my @Handle is @BornToBlogClub but I could make my “Name” on my profile “Born To Blog Club” so it’s more readable. But, my Twitter (now x) URL will remain the same via https://twitter.com/borntoblogclub
Profile Pic
The first thing I add to customize my profile is a profile picture or it could be your blog logo that you created! So it does not have to be a picture of you in fact you can blog with a MASK on if you want to and no one would know who you are unless you want them to!
I used the logo I made for my blog using Canva for FREE as my profile picture. But, no matter what you choose to do be sure to use the SAME PROFILE PIC OR LOGO across ALL your social media not just Twitter (X) — you’ll want to use the same profile picture on Facebook, Instagram, Linkedin, Pinterest, YouTube, TikTok, etc…
Add Header
Uploading a banner or header for your Twitter (now x ) profile is important because it is the first thing people see when they visit your profile or meet you for the first time — minus your logo.
I think of a header as a billboard for your blogging brand and empire! So be sure to upload one that shares your website, maybe even your email address and other social media platforms you’re on, that way they can follow you there!
I like to create mine in Canva and then just customize them for each social platform to match the size (if I need to) BUT I try to keep them the SAME across all my social media platforms.
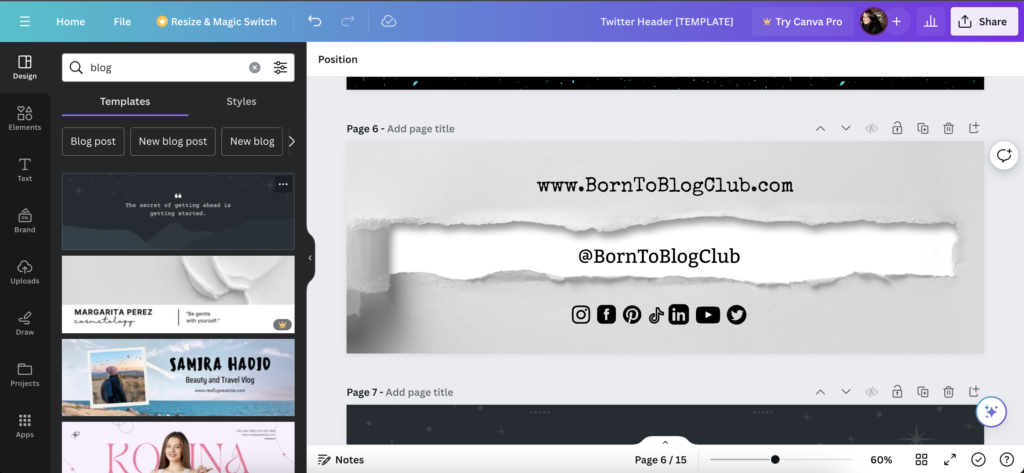
Bio
Normally I’d say to use your “Tagline” for this area. This is only a few words to describe your blog, who you are, what you do, why people should choose to follow you! Mine could be “I Love To Blog” or “Blogging Is My Life”. and I might also include my website here even though Twitter (x) has a place for you to add your website as well.
Location (optional)
I don’t usually put my location, but it is a good idea to do it. I’m usually never in one place for long so I always feel weird having a location on mine or like I need to keep it updated all the time. BUT, if you have a location then Twitter will match you with others locally and position your content to be seen by them as well. Providing your location is “optional” either way.
Website
Again Twitter or what is now X give you a place to put your website URL for mine I use https://borntoblogclub.com/ but I’ve also used my YouTube Channel and my LinkTree. It just depends what Link I want people to click at the time. No matter what start with your website even if it is not set up yet. Once it is they when people click the link it will be!
Review Your Profile!
Once you are done be sure to save all your changes and review your Twitter profile! Click all your links to make sure they work and go to the right places. Also, take a peek at your Twitter profile on your Mobile Phone as well as your desktop to see how it shows up. You can continue to make any needed changes.
Learn EVERYTHING you need to get started blogging and become a successful blogger — Take My FREE Blogging Course!
What are the steps to post a twitter X post?
Posting on X (formerly Twitter) involves a few simple steps. Here’s a breakdown for creating and publishing a post:
Steps to Post on X (Formerly Twitter)
1. Access Your X Account
- Open the X app on your mobile device or visit X’s website on your desktop.
- Log in with your username/email and password if you aren’t already signed in.
2. Locate the Posting Icon
- Mobile App: Tap the “+” or pen icon (usually at the bottom-right corner of the screen).
- Desktop: Click the “What’s happening?” box at the top of your Home timeline or use the pen icon in the navigation bar.
3. Write Your Post (Now Called a Post Instead of a Tweet)
- Click into the text box and type your message.
- Include:
- Text: Share your thoughts, updates, or content.
- Hashtags: Add relevant hashtags to increase visibility (e.g.,
#Blogging,#XMarketing). - Mentions: Tag other accounts using
@Usernameto engage with specific users.
4. Add Media (Optional)
- Click the media icons to enhance your post:
- Photo/Video: Add images or videos from your device.
- GIF: Choose from X’s built-in library.
- Poll: Create a poll to engage your audience.
- Link: Paste a link to your blog post or website; X automatically generates a preview (if supported).
5. Customize Visibility Settings (Optional)
- Who Can Reply: Tap the reply settings (icon below the post box) to choose who can engage with your post:
- Everyone
- People you follow
- Only people you mention
- Audience Selection: If you use X’s community or subscription features, decide if the post is public or restricted to subscribers.
6. Review and Post
- Preview your content to ensure accuracy (especially links and hashtags).
- Hit the Post/Publish button (typically labeled “Post”).
7. Monitor Engagement
- Check for comments, likes, reposts, or shares.
- Respond to comments and engage with your audience to maximize visibility and interaction.
Pro Tips
- Timing: Post during peak hours when your audience is most active.
- Frequency: Post regularly to stay visible in timelines.
- Analytics: Use X’s analytics tools to track engagement and optimize future posts.
With these steps, you can effectively post and engage with your audience on X!
Learn How I Set Up EVERY Social Media Account For My BLOG (the RIGHT way)…
Please leave a comment below and Let me know your thoughts on this post.
Don’t Miss A Thing…
Follow @BornToBlogClub on your favorite social media platforms via: Pinterest, Facebook, Instagram, Twitter X, LinkedIn, TikTok, YouTube and Don’t forget to Sign Up for the FREE B2B NEWSLETTER!
ABOUT ME:
If we haven’t officially met, Hi I’m Blogging Brandi an EX-Corp Kool-Aid Drinker, born to be a blogger, Creator, and Entrepreneur! I also have a Degree in Finance and am a Licensed Cosmetologist. Plus, I LOVE RVing and hanging out with my Dogs ( I have a Cat too!)…
Affiliate Disclaimer: Note this description contains affiliate links that allow you to find the items mentioned in this video and support the channel at no cost to you. While this channel may earn minimal sums when the viewer uses the links, the viewer is in no way obligated to use these links. Thank you for your support!
Related:
- How do I create a Twitter account for my blog?
- How to Use Twitter (Now X) – Mailchimp
- 12 Formulas: How to Use Twitter to Drive Traffic to Your Blog
- How to Share Blogger Posts on X (formerly Twitter) – VIDEO
- Complete Guide: Pinterest for Bloggers 101 (getting started & driving traffic to your blog)
#Twitter #X #TwitterForBloggers #Blogging #BloggingTips #Blogger #Blog #Bloggers #BornToBlogClub #XForBloggers #FreeSpeech #NoCensoring #SocialMediaMarketing #MarketingForBloggers #MarketingTips #Blogs #BloggingCourse

If we haven’t officially met, Hi I’m Blogging Brandi an EX-Corp Kool-Aid Drinker, born to be a blogger, Creator, and Entrepreneur! I also have a Degree in Finance and am a Licensed Cosmetologist. Plus, I LOVE RVing and hanging out with my Dogs ( I have a Cat too!)…
