
Ready to actually build your blog? Learn How To Start a WordPress Blog Step By Step (Beginner Website Setup Guide), including domain, hosting, theme & launch tutorial.
If you’re looking for how to start a blog step by step, this beginner-friendly tutorial will walk you through setting up your WordPress website from scratch — even if you don’t have a name yet.
🎥 Watch: How To Build a Blog Website From Scratch (WordPress Tutorial for Beginners)
(& keep reading to follow along below…)
LINKS MENTION
- GODADDY RESELLER LINK to set up Managed WordPress + Domain Registration and Hosting etc…
🎬 Watch the full 7-Day Start Blogging Challenge + get the checklist here
👍 Like, subscribe @BornToBlogClub on YouTube and tap the bell so you don’t miss Day 4.
📚 How To Start a WordPress Blog Step By Step (Beginner Website Setup Guide)
Wondering How to Start a Blog in 2026? Ready To Launch Your Voice: Create a Blog in less than an hour (Seriously!) Everything you need to know about creating a Website in just a few Minutes! This is a Step-by-Step Guide that is part of my Blogging For Beginners tutorials!
If you have been asking: How do I create my own blog website? What is the easiest site to start a blog?
Answer: WordPress + GoDaddy is the fastest, easiest way for How To Set Up Your Blog Website. However, when the question arises about how to create a Website for your blog, everyone has their own advice on which hosting provider to use.
So if you want to know How to Start a Blog FAST in a matter of Minutes, this is for you! Here’s how to make your website a step-by-step guide!
Step 1: Choose Your Blogging Platform
Why WordPress (customization, plugins, ownership)
Step 2: Get Hosting + Register Your Domain
Mention:
- GoDaddy
- Managed WordPress
- SSL certificate included
Step 3: Install Your WordPress Theme
Optional mention:
- ThemeForest
Step 4: Create Core Website Pages
- Homepage
- Blog page
- About page
- Contact page
Step 5: Add a Shop With WooCommerce
Mention:
- WooCommerce (note: if your CMS doesn’t support software entity type, remove entity formatting and just mention normally — only use if supported)
(If software entity type is not allowed in your system, do NOT format WooCommerce as entity — based on your allowed types list it may not be supported. So if sticking strictly to allowed types, only wrap GoDaddy and ThemeForest.)
Step 6: Customize Colors, Menus & Layout
Step 7: Launch Your Blog
Encourage imperfect action.
Call to Action
Join the FREE 7-Day Get Started Blogging Challenge and grab the checklist!
How To Create A Blog Website From Scratch (WordPress + GoDaddy)
It has already taken me longer to write this than it did to complete the steps in this process. I like to use GoDaddy’s Managed WordPress Hosting to create my blogs (aka websites). All I do is answer some questions, click a few buttons, and whala I have a website! Along with a blog, online store, and more that I can customize.
You don’t even have to come up with a name or buy a domain to build a website, blog, etc… In fact, I didn’t when I was going through this process!
Too many people make excuses and struggle with the process of taking a step toward starting their blog and website. So, I’m breaking down the steps showing how EASY and FAST it is to start a blog with this 5-minute process!
Although it may take you a little longer than it does me. It’s time to Launch Your Blog and voice out into the world. THIS is how to create a Blog in 5 Minutes (Seriously!)
Sign Up For GoDaddy’s Managed WordPress Hosting
First, be sure to sign up for GoDaddy’s Managed WordPress Hosting platform. I cannot stress this part enough MANAGED WORDPRESS!
I use the bottom, lowest, cheapest, aka “BASIC PLAN” to build a website, with an online shop, and a BLOG! You can always upgrade if needed later on. Once you do this, you can go through the process of setting up your blogging website.

Start Building Your WordPress Website
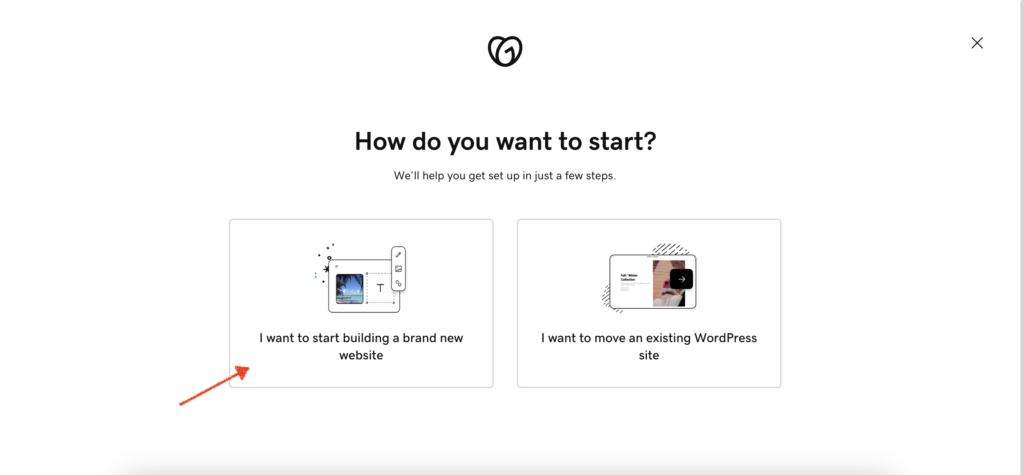
The next question you need to decide whether you want to start building a new website or migrate an existing WordPress website. If you have one, you can migrate it over, and it will be almost a complete copy of your existing website. Alternatively, you can create a brand-new blog website, as I’m showing you how to do here.
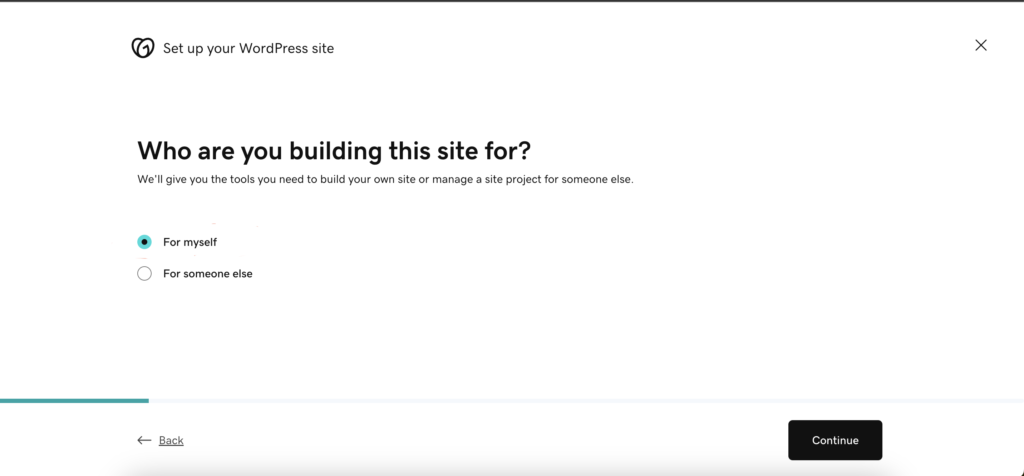
Who are you building this website for?
The next question you should know the answer to is who are you building this website for? — Yourself or someone else?
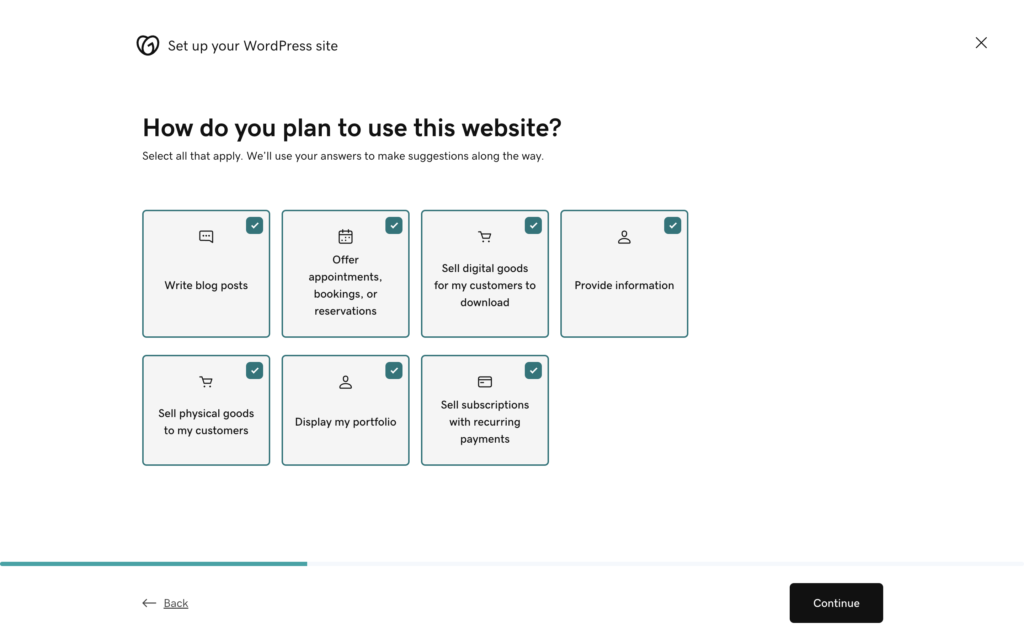
How do you plan to use this website?
Obviously, you want to build a blog to write blog posts, but essentially you’re building a website, with a blog on it. But, you can add other options like an online store, appointment scheduling, displaying your portfolio, etc…
Unsure which features you want to add? During set-up, select all initially, so that any you might need are installed from the start; you can always go back and remove the unnecessary ones later.
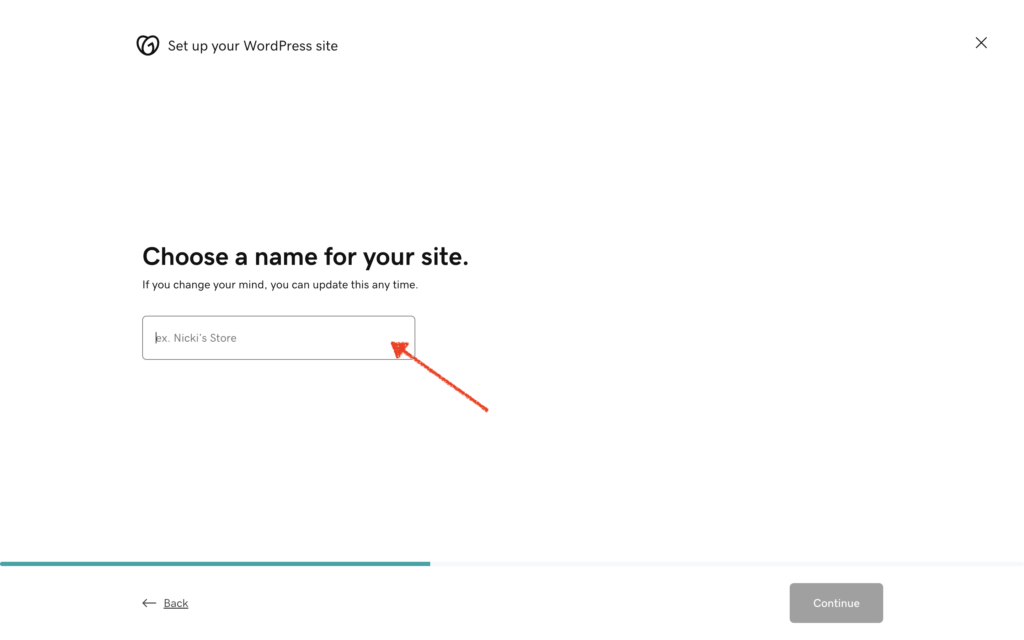
Choose a Name for your site
Next, you will choose a name for your blog website. Do not worry you can change this later, at this point, your blog website is not going to be public. You will have a strange www.URL.com address ( www.hgjfuynt6475.myupload.com. This is something you will change later once you buy a domain name, connect it and launch your website, etc…). For now, use a word that describes your website like Travel Blog, Money Blog, Dog Blog, RV Blog, Business Blog. Keep it simple! This is just to help visually set up your website for now.
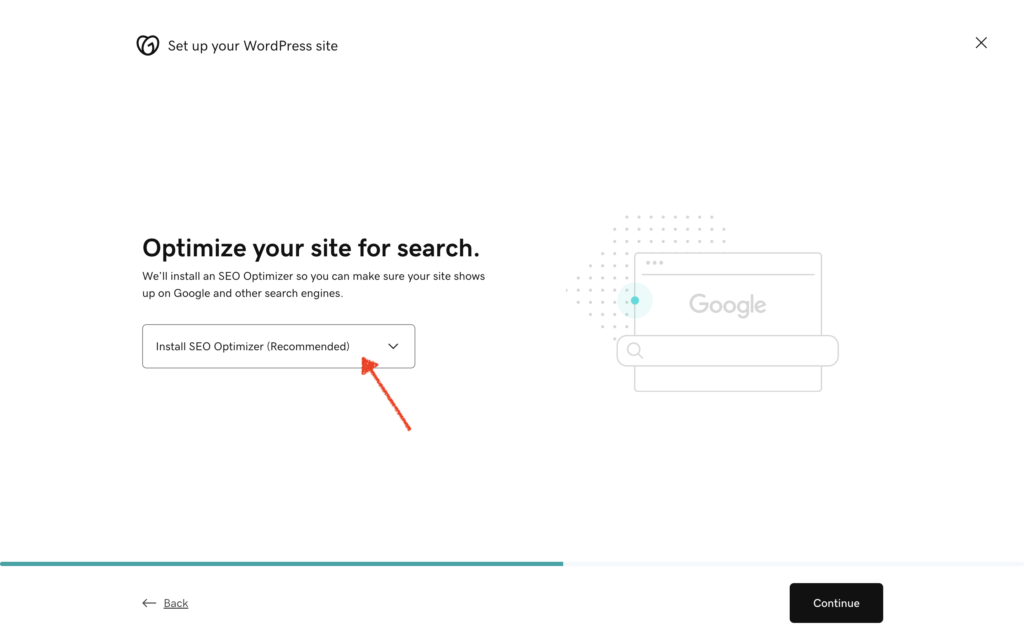
Optimize your site for search
It will ask if you’d like to optimize your blog website for search engines to be able to index your content. I, as well as GoDaddy, recommend you install the SEO optimizer!
Optimize your site for speed
Next, Choose the recommended location to help optimize your blog website for speed.

Pick a template or start from scratch
Next, you have to decide whether you want to use one of the GoDaddy Theme Templates or start from a Blank Template. You can preview them before making a decision.
FYI, the Blank Template is really BLANK, great for those who plan on buying a theme and installing it. But, I’m warning you, it is BARE — no menus, no pages, no posts, no homepage or blog that is usable or customizable. You have to build everything from the ground up!
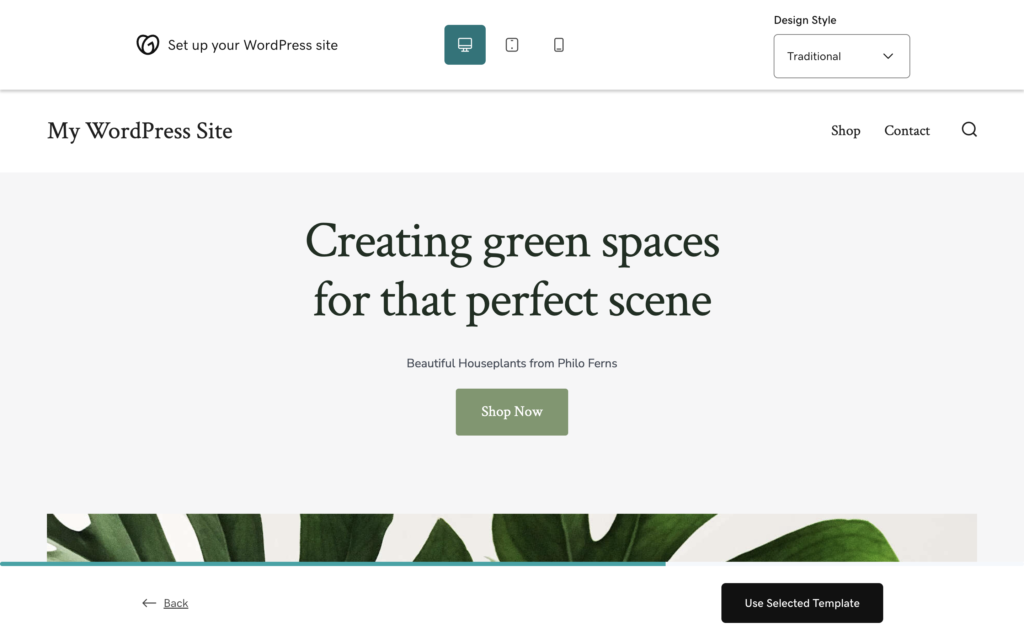
Picking a Template using one of GoDaddy’s Themes is the best way to go for having something to start with. You will still need to customize things like the menu, colors, images, etc… I chose a theme with a clickable button at the top so I can add a call to action like “Sign Up for My Newsletter.”
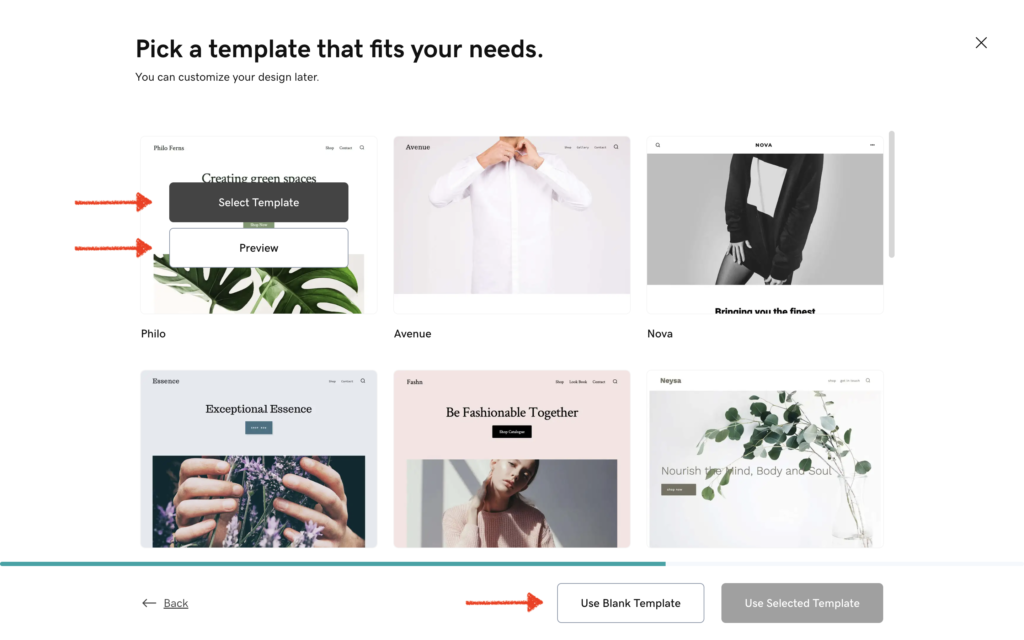
Preview
Once you choose a theme for your new blog website you have the option to preview and/or install it. Or you can keep on looking for another one that fits your needs.
Keep in mind, if you pick a theme and don’t like it once it’s installed, you can change it later. Don’t worry about the small stuff! You only need GOOD BONES to start. Then you can customize your blog website’s look and feel to be your own.
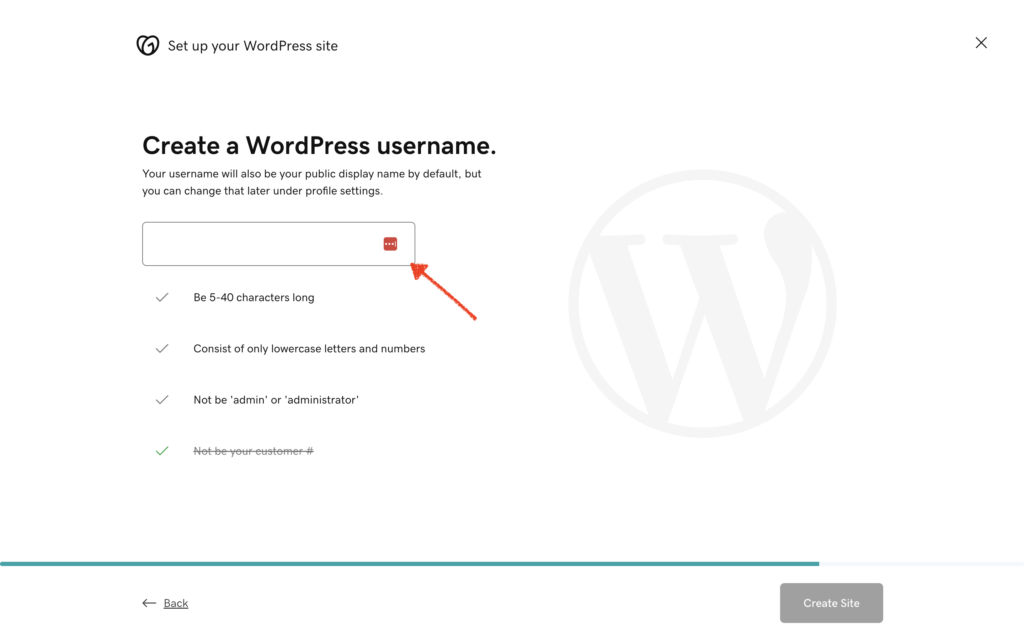
Create a username
Next, you need to choose a username to be the admin for your WordPress website. You can add other admins and change this later on.
Preparing Your WordPress Site – just sit back & wait!
Now you wait for the magic to happen! It only takes a few minutes, then you’ll be automatically directed to your new WordPress blog website.
Typically, I get an email letting me know my new WordPress website www.UFNisdh7864hffjs5.com is ready! I usually leave the screen up until the website is done, so it will sign me in and redirect me 😉
Time to start customizing your new website (& then launch it)
Once your new website is set up with a basic theme installed, time to start customizing the look and feel. (i.e., the colors, logo, images, menus, pages, etc.).
Go To The Left Hand Navigation Menu Under “Appearance” >> and select “Customize.” This will allow you to change many of the “visual” aspects and functions of your website.

Customize your pages
You will want to go through and customize your main pages like your homepage, about page, contact page.
Edit Your Navigation Menus
Also make sure all your shop, pages and blog posts are added to your menus (under the Appearance >> MENU)
Add your blog posts
And of course, hopefully, you’ve already started writing your first blog posts and pillar content. You can add those under the “Posts” tab on the left navigation menu (in your WordPress dashboard)
Review & Launch Your Blog!
Last but not least, you’ll want to look over what your finished website will look like. Don’t forget to connect the domain name you purchased, if you haven’t already done so. Finally, launch your new blog website!
Now you know how to start a blog and create your website! Drop a comment below to let me know what questions you have! I can’t wait to read them and hear your thoughts on this post.
Also, don’t forget to Sign Up for the FREE NEWSLETTER!
Related Articles:
- Launch Your Voice: Create a Blog in 5 Minutes (Seriously!)
- How to Start a Blog in 5 Minutes
- How to make your website in 5 minutes- a step-by-step guide
- How to set up a blog in 5 minutes
- Creating a Website in 5 Minutes: A Step-by-Step Guide
- How to Start a Blog in 2026 | Blogging for Beginners
Here is the video transcript:
In this video, I’m going to teach you how to start a blog step by step. I want you to think blogging for beginners.
My goal by the end of this video is that you have a real living, breathing blog online.
If you’re starting from zero, this is the video and this series for you. But in this episode, I’m actually going to show you step by step, how to set up your website, your blog, your shop, your about page, your contact page, everything. This is probably the most important video out of the entire series.
So if tech scares you, don’t click away. Just follow me in everything that I’m about to say.
If you’re new around here, I’m Blogging Brandi, and welcome to day three of my Get Started blogging challenge. In case you missed any episodes, I’m teaching you in one week how to start a blog from scratch, step by step, and how to monetize it.
And so by the end of this Series If you’ve missed any of these, I’ve created an entire playlist that you can watch plus a checklist that you can pick up and follow along and check off all the little boxes so that you know you’re not doing anything wrong.
Okay, I want you to imagine that we’re sitting down together and you’re like, Hey, Brandi, I want to start a blog, but I don’t know how to do it. I want to set up a website. I want a blog. I want a place where I can sell something. I don’t know what yet. I don’t even know what my blog’s going to be about. I don’t have a name picked out, but I just know that I want to start one.
I’m going to show you how to start a blog. Set up your website, a shop about page, contact page, homepage, and, a platform so that you can start blogging as soon as you decide on your name and everything else, what you want to blog about, but you don’t have to have any of that to be able to do this. So if you don’t have a name yet and you don’t know what you want to blog about and you’re not sure, don’t you worry.
What I’m going to teach you, you don’t have to have yet. So you’re going to have a temporary website name until you decide on one, and then you can buy your domain name, your little www dot BloggingBrandi.com, or BornToBlogClub.Com, and then we’re going to have your website set up. You can buy your domain name and then you’re going to connect them and they’ll work together.
But right now we’re just going to set up your website. This is going to be so fast. You’re only going to have to do this like one time, but after you do it, then you’re going to have a platform. Then you’re going to have a little painting. In canvas that you can start to perfect on. So it’s really hard to perfect on something or make something better if you haven’t created it yet.
Step 1: Choose Your Blogging Platform
Why WordPress (customization, plugins, ownership)
And there’s different ways to build websites, but I like to use GoDaddy. Managed WordPress comes with a SSL certificate. And all of the things that you need hosting. I buy my domain names there. I use that for my hosting. I use it for building my websites. Everybody has their own thing, but what I love about WordPress is I can add little plugins and do all these little things, change the theme out, and make the website do anything I want. I’m giving you a blank template to be able to create anything that you can imagine on.
So open up a new tab and do this with me. You can pause this video if you need to rewind fast, forward, step by step, follow my process. If it gets confusing or I don’t explain something right, or you have more questions, let me know in the comments below this video so that I can make a follow up video answering your questions.
Watch The Video:
(& keep reading to follow along below…)
LINKS MENTION
- GODADDY RESELLER LINK to set up Managed WordPress + Domain Registration and Hosting etc…
🎬 Watch the full 7-Day Start Blogging Challenge + get the checklist here
👍 Like, subscribe @BornToBlogClub on YouTube and tap the bell so you don’t miss Day 4.
So let’s get started. If you head over to Born to Blog Club, I’ve got my FREE blogging course over here that you can go to, and I talk about how to create a website in just a few minutes, using GoDaddy, and so create a blog website.
🔗 GODADDY RESELLER LINK to set up Managed WordPress + Domain Registration and Hosting etc…
It’s going to be super easy for you. If you go down through here, I give you all the steps that you’re going to need to do to build this website.
So first things first, you’re going to go over to GoDaddy’s managed WordPress, which is going to actually take you to my GoDaddy reseller account. This is where you would purchase the plan that you’re going to need to do this. So this isn’t free. It’s a little bit of an investment, and I do get a little bit of commission if you use my link and set it up on my platform. But the other thing is, if you have questions about your website that you want to ask me, book a call with me, get into coaching, or whatever it is, you will have this on my platform and I would be able to go into the backend and help you.
I can’t do that if I don’t have access. This would give me the ability to get access from you if you granted it.
You’re going to go to the link that I give you. You’re going to set up your website here. You’re going to go to manage WordPress, and you can also, when you’re ready, you can go in here and buy your domain and do your domain registration here as well.
Same thing. This is where you will look up your website if you want to see if something like black sheep. Dot com was available. It’s going to tell, you know it’s taken, but you got all these other options and you can buy those, or you can search for something else. And we’ll talk about choosing a name for your website, your blog, how to do that, how to research it, as well as your social media handles and all of that.
But for now, let’s just set up your website and then we’ll come back and customize it and make it all pretty and do whatever you want.
So you’re going to go to the link that I give you.
- CREATE YOUR ACCOUNT & SIGN IN — You’re going to Go to sign in, you’re going to become a new customer and hit create my account and then sign in.
- WEBSITE + HOSTING PLAN – And then you’re going to go down to your managed WordPress basic plan. You’re going to click basic; you can always upgrade later on. You’re going to add this to your cart and purchase it, and then it’s going to take you to another page.
So you’re going to end up on a page like this, after you’ve purchased your plan, it’s going to say…
how do you want to start creating your website? We’ll help you in just a few steps.
You want to create a new WordPress website, or do you want to import an existing WordPress website? So say you wanted to import an existing WordPress website that you already had somewhere else, not GoDaddy, you could do that here. But what we want to do is create a new WordPress website, and then do we want to do it for myself or someone else?
Who are you building this for? I’m building this for myself, so I’m going to hit continue. And then where are you located at? We’re going to optimize it for speed. I’m in North America, it already chose that for me. And then it says, how would you like to create your new site? Do you want to use ai? GoDaddy’s Airo, I think is what it’s called, and it can help you set it up in just a few minutes.
Or do you want to start from scratch? Now, I’ve done this little AI, and I’m not saying it doesn’t work, and if you are just a complete don’t know what to do, maybe this would be for you. I personally don’t like it, and I’m going to show you how to set it up from scratch. Now you can set it up one way, delete it, go back, do it the other way.
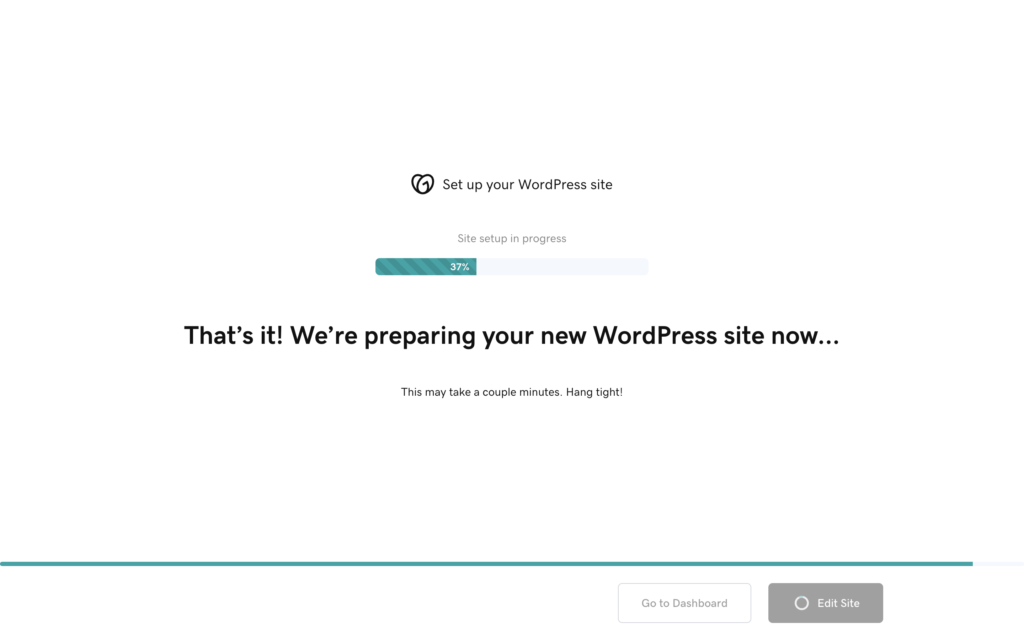
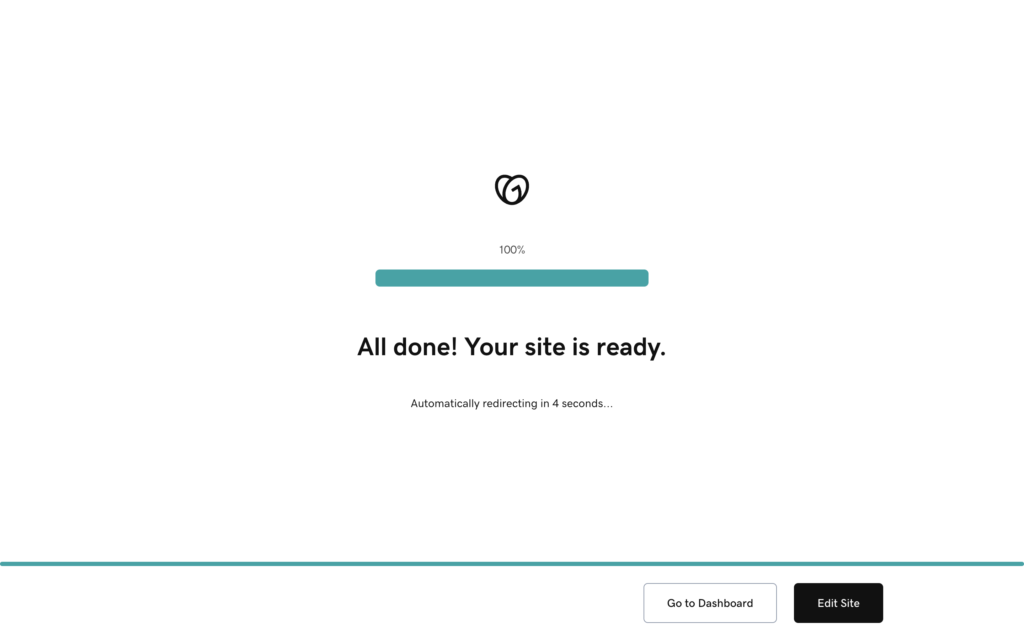
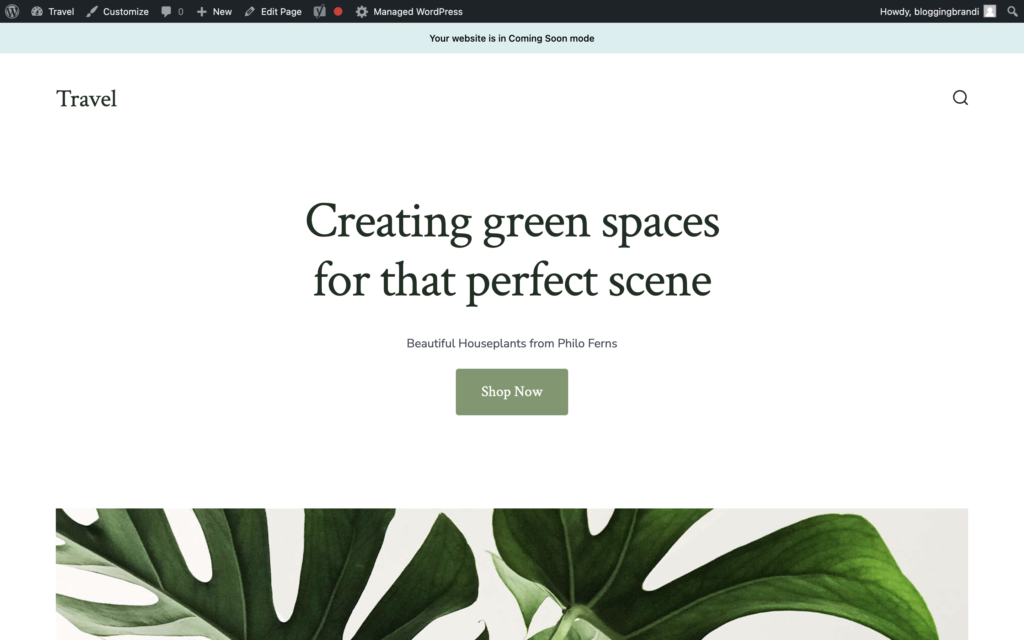
If you don’t like it, I’m going to show you how to start from scratch. So we’re going to choose a WordPress username. And then we’re just going to say, create my site. And it says, that’s it. We’re preparing your new WordPress site now, and it just takes a few minutes and they set up your site. It says, all done. Your site is ready automatically it’ll redirect us in just a few minutes, but we can go to edit site or go to our dashboard, but it’s going to take us there. This is what the back end of your website looks like. You have a website domain. This is your domain Right now, it’s not, BloggingBrandi.com or BornToBlogClub.com. But if you go to this, it’s going to have a parked page for you if you were to check this out.
In an incognito tab. It says, great things are coming soon. And so it’s just a little parked page and it says, powered by GoDaddy. So people know your website’s there, but they can’t really do anything with it. So if you go back here and you’re on the back end of your dashboard, and you can even see it says, show your site to the world and get visitors, launch my site, but your site’s not live, so you can’t do that.
But you can see what your site looks like. If you go to my WordPress site and click visit site and it’s going to show you it’s pretty boring. There’s nothing there. This is all set up for you. This is what it gives you as a blank template for you to use on your website. And so you can go in here and play around with this and do all kinds of little things, but this is what it gives you to start with.
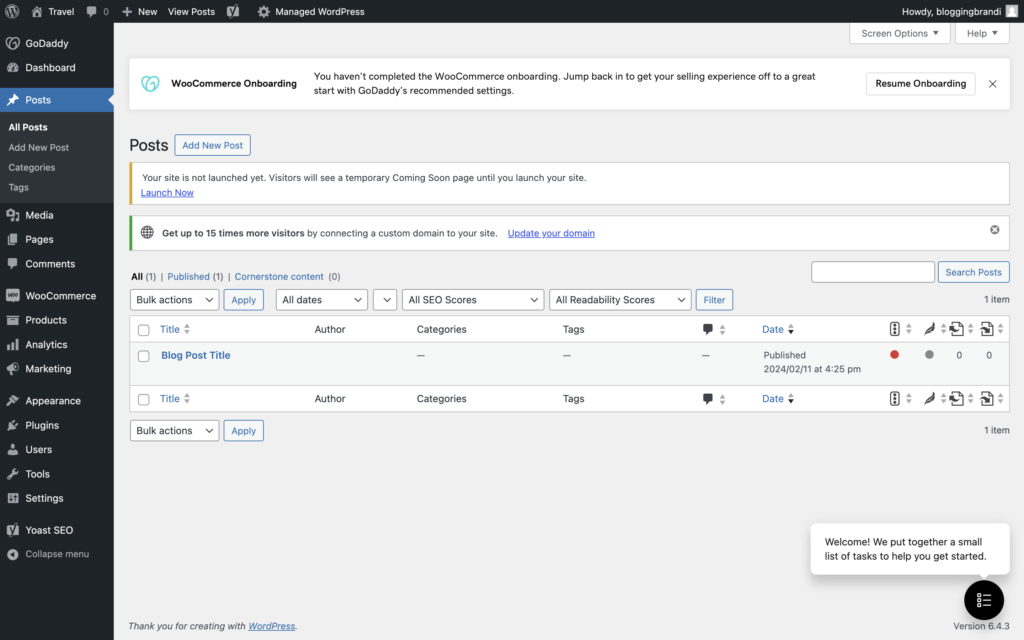
And again, it’ll tell you up here, your website’s in coming soon mode. You can launch it here. We can go into customize the site. There’s all these little links, is where you can add a post page. But I just want to show you the backend first. So if you’re in your dashboard, you can see there’s nothing here.
There’s no menu, no pages, nothing. If you go to this little left hand column, this shows you all your blog posts are going to be here if we had any. There are not any, I’ll show you no blog posts, but this is where you would add them. You’d hit add posts or you could go up here and say New post or on the side, add posts, categories, tags, all that.
You’ll do that later. Media. This is where you’re going to add files, like videos, pictures, or where those will end up being when you add them. And then pages. I don’t think there’s any pages in here. We’re going to have to set these up. Just a privacy policy. Comments. This is where you can change the look and feel of your website.
And then plugins, users, tools, settings, all of these are little things that you can change. So what we are going to do is we’re going to add a couple pages, blog posts, and then we also need to add a few other things.
Choosing & Installing A WordPress Theme
But let’s just go in and. Maybe say, okay, well, I want to choose a different theme. And you can also buy themes and change the look and feel of your website to be completely different.
So right here, we’re just going to choose a basic theme that’s already in here from GoDaddy. And I’m going to, you can do a live preview, but I’m just going to activate this one because I, I’ve used this one before and I kind of know what it looks like. And so this theme is what’s on our website now, but if you go to our website, you’ll see it’s probably blank now.
There’s nothing there. See, it’s all blank. So I changed the theme of the website. Now, one thing I want to show you is a theme, just so you understand what it is, is if you go to Theme Forest, and you wanted to look up a WordPress theme, and it could be anything, but let’s just say we’re doing a blog. We can choose any of these themes in here, and you can even say that you want it to be a certain kind of blog.
So maybe we want a fashion blog, fashion WordPress. We can pick one of these out, look at them, and then install it on our website. So I just want to see a live preview of what this would look like on my website. And, these pictures and things don’t necessarily all come with a theme. You’re going to have to change those out.
Some of them have them, but you’re not supposed to use them. They’re owned by the theme, but you can see this is what the theme looks like. So I could use this theme if I wanted to. And then if you go up here and you look under these tabs on these themes, they kind of show you more of like what this could look like.
And you can play around with this and see what different pages are going to look like. So say that you look at your contact page. Actually, this is going to be theirs, I think. No, this is, so say this is your contact page. This is what it would look like. And then your shop page, this is what your shop page is going to look like.
So if you like this theme, then you can hit buy now and you can purchase it and use this as your theme. This is what it would look like. And all these things, but you’re still going to have to set some of this up. It’s not like you’re going to install this and it’s going to look just like this. You still have to set this up, but you would buy this, you would get the little zip file, and then you’d go over to your website on the back end and you would hit add theme.
You’re going to hit upload theme, and then you’re going to choose the file zip and then hit install now, and then it’s going to walk you through the process. So if that’s, if you want to choose like a fancy something and you would purchase those, but I’m showing you how to do this from just the basic templates that GoDaddy gives you.
So right now our website is pretty boring. There’s nothing going on, and it’s because we have to add things. We have to set it up. Now you can customize the look and feel of the website, but there’s nothing to really customize yet. One thing I’ll tell you when I added this theme is there’s probably some plugins that need to be activated.
Let me go to the theme design right here. And just hit install plugins because I know that this plugin needs to be installed and it’ll walk you through this. You’ll figure this out eventually. But I just know that from this theme that this plugin has to be installed because I’ve already done this. So then return to the plugins installer, it’s going to say, okay, we need to activate. Any plugins, themes that you install, everything gets installed and then you have to activate. Just so you know, there’s two step process, and then now if I go over to my plugins page, I’ll see that this plugin is in here. That’s the CoBlocks. Now, there’s another plugin that I’m going to want to add because I’m going to want a shop page in my website. Let me go ahead while I’m in here. I’m going to add this other plugin because you’re going to need it. It’s already here because we don’t have it. But WooCommerce, we’re going to hit install now and go ahead and add this plugin in because this is going to be the shop and where we can sell our products and it’s free to use. Now, there’s some upgrades, upgraded plugins that they’ll try to get you to buy, but again, now we’ve installed the plugin. Now we need to activate it. And if you want to look for more plugins, you can either upload a plugin or you can go search for plugins right here. But right now we are trying to activate this plugin.
If it wasn’t here, that’s where you would search for it though. Okay. So now it says it’s in here. We’re going to skip the onboarding. I don’t want to do any of that. All I want right now is for you to see that now we have this WooCommerce and our products and payments over here on the side, so we didn’t have that before.
And then up here, if we want to see our website, we have Visit site. Visit store. Now that we’ve got a couple little changes made, we’re going to add three blog posts, three products, and a couple pages. So let’s just add a couple blog posts right now because I just want. You just see, I can either add it here, add blog posts, or I can go over here to blog posts and hit add posts.
But you can see that there’s no blog posts created yet, so you can add a post here too. And so I’m just going to say blog post number one, and we’re going to publish this. And normally I would not tell you to publish this, but we’re just going to go in here and add the first blog post. And you can see it’s pretty boring.
There’s nothing there. But if you did add a blog post in here, you can set your featured image, you can choose your images, you can choose a stock photo. If you want to just put some kind of stock photo in there and import that. And that would be the photo for your blog post and hit set featured image. And that’s going to show up there.
And there’s all these other little things that I’ll get into later that you can do to, to put on the backside of your blog post. So blog post two, we added that. And then it’ll ask us if we want to see it and we can look at this and I’ll show you. See now it’s got a little picture up in here and there’s all these little things you’re going to have to do to customize this, but you can go back in and edit the post or we can add another post.
So we’re going to add one more. I’m going to do blog post three, and I’m going to publish it. And I’m actually real quick, going to add. A featured image because if I don’t, you’re not going to know what it looks like. So I’m just going to add these in here and set featured image for all these blogs. And so let’s say that I forgot to add the featured image to a blog post one.
I’m going to go back and add that. So I’m going to go back to my dashboard. And I’m going to go over to my post and you’re going to see that all the posts are here, but I know I didn’t put a picture with post one. So I’m going to go back in here. I’m going to say edit post one. I’m going to add this feature to image. I’m just going to pick a random image.
So put some kayaks and then this is going to be set up so you can at least see what this will look like. So set the featured image, save that my changes.
And I’m going to go back to my dashboard and now you can see all my blog posts are here. You have to have content for it to look like something on the other side. So we have a couple blog posts here. I want to add just some products to my WooCommerce because you can set this up later on, but. You’ll see up here.
You have a store and there’s nothing here, but you’re not going to have anything there because you don’t have any products. So if you go back to your dashboard, you can go up here to new and hit product or page or whatever you’re going to add. Or you can go over to WooCommerce and see that you have the couple tabs down here, products, payments, and you’re going to set up payments you can set up, these can be your products, they can be Amazon Affiliate Link products.
But let’s just say we’re going to go add a new product and we’re just going to put product one, and this will walk you through again, you can add an image over here if you want to put a product image in here. And then you’re going to know what that’s going to look like on the back end if you actually had a product in here.
So let’s just see. We’ll just put a, a car in there. Just I want you to see the pictures so you can see what the products actually will look like. So let’s just say that we put this product image here. And again, you can do all these other little things in here later on, we’ll go come back and set up products.
But you can come down here and you can decide, put a price in here. Is it virtual? Is it downloadable? You can do an affiliate link and link out to like Amazon, and this is where you would put your product, URL and your button texts after you signed up to whatever affiliate products. And once you set this up, you can add your descriptions, all that, and then you can either save draft.
Preview or publish, we’re just going to publish. because I want these products out there so that we can see what they’re going to look like on our actual website. So I’m going to add these and then I’m going to add two more products real quick. Same thing. We’re just going to put a product image in there because I want you to see what they look like.
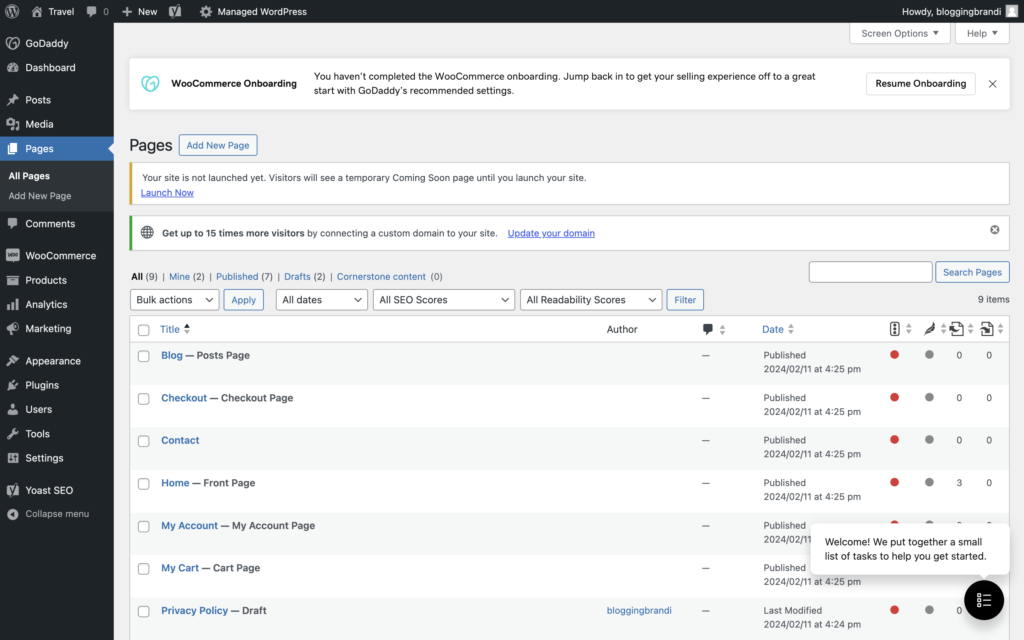
And now if you go to your store setting on your site, you’re going to see these products in there. So now that you’ve added the products, you can see them. So you can go in there, you can change all this later, but now you have your shop set up. But if you notice we still have no menu, so we don’t even know how to get to these things.
So we’re going to have to add these to our menu. But before we can do that, we have to have the rest of our pages and a few other things. So one thing I want to do is I want to go and I want to set up a couple pages. So if I go to Page and set up new page, it’s going to give us a couple, we can do an about a contact and a home.
This is great. So let’s do a homepage. because we need a homepage and let’s publish this homepage. But. I’m going to hit publish now. You can view this page and see what it’s going to look like. And you can go in here. There’s no pictures here, so you’d want to add some pictures in here so that your homepage looks a little bit different.
And again, you would do that when you’re editing the page. You go down here and like replace this photo. So you could go to your media library and you could put this photo in here. And change that out and save that to be your website photo. Or you could upload your own photo when you’re in here. You can hit upload file, you can use stock photos, or you can choose something that you already have.
So that’s where that’s at. Now we want to add some more pages in here. So we’re going to go back to our WordPress dashboard. We’re going to hit add page. We want to do an about page real quick. And I’m not putting anything in here. I’m just adding this. You can go back in here and type and add and customize to your heart’s content, but we’re just publishing these pages right now.
So we’re going to add that. It says you want to view the page, I’m going to add another page. And there’s all kinds of different places where it’s going to do this. So we did about, we did home, let’s do contact. Let’s get in touch, publish this page, publish. And then, we’re going to go to the backend now that we have all these things published and whoops.
Now you can see we have all these pages and some of these came like this refund and returns came from the WooCommerce, and you would have to go in here, and these are drafts. You’d want to edit these and add them if you’re setting up your shop, which that is a whole other ball game, a whole other video.
It’s pretty simple and self-explanatory, but when you get through the process of setting it up, it’s going to ask you questions. We want to set up one more page is our blog page. We don’t even have our blog page. And I’m going to show you, if you go in here and you set up a page, we’re going to just do a blank page and we’re just going to call it blog and we’re going to publish this page.
And so this is where our blog posts are going to live, and I’m going to show you how this is set up in a second. Now, if you come back to the backside and you’re, you’ve got your pages set up, you’ve got your posts set up, now you’ve got connect a few things. So let’s say that we are looking. Depending on how you get to this.
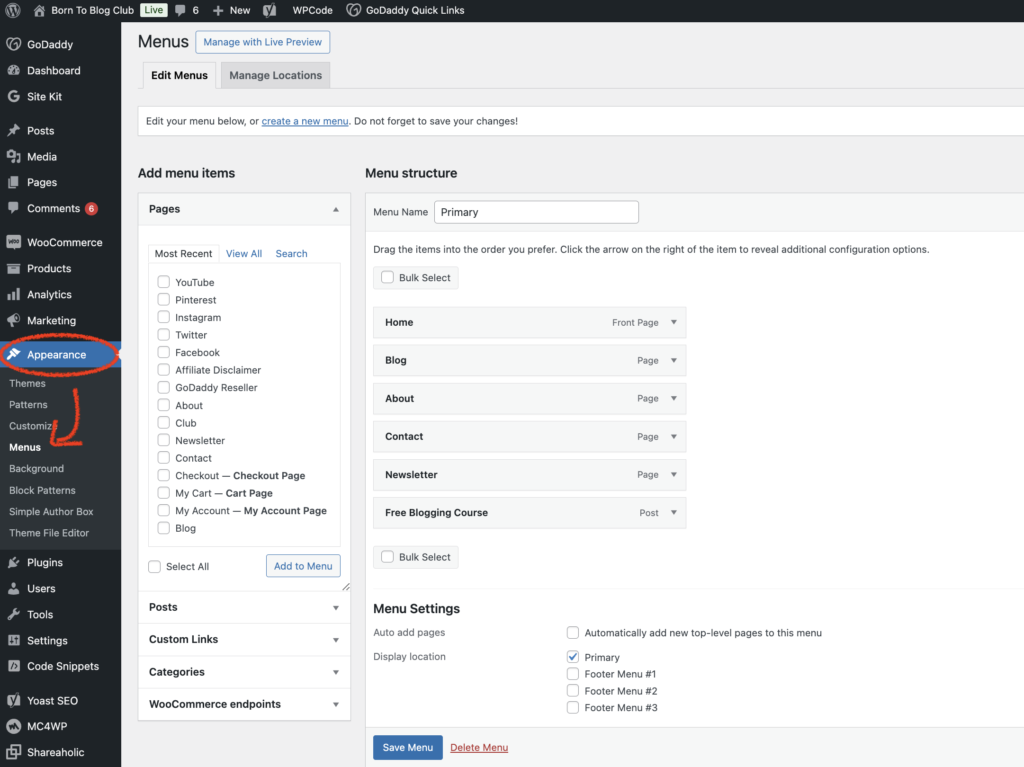
Adding Menus To WordPress Website
My WordPress site, I want to go to menus. Now, if you were in your dashboard, you could go do this too over here. You’d go over to appearance and menus. So we want to add some menus to our site, because right now we don’t have any. So first we need to actually set up a menu. So we’re just going to say primary menu.
We’re going to add it to a primary. You could also add it to the footer. I’ll show you that in a second. But we gotta set up the menus. So we’re going to hit Create Menu. Now we want to add all of these pages that we just created to our menu. So we’re going to add these pages and then we’re going to organize them. So I probably want to do my homepage first, my blog second, my about page.
And I also will need my shop page. I want to add that. And just organize these how you want them. And then my homepage, I don’t want it to say homepage, I want it to say just home. Hit save. And then if you go over to your site and look at it, now you can see that your menus are here, but I want to go down here and add my menus to the bottom as well.
I’m going to go back to my dashboard. I’m going to go to appearance menus. You can see what we set up, but I also want this to show up on the bottom, or I could set up a new menu and do a different footer menu, but I just want you to see how this shows up on the bottom too, so you can go back to your site. And now if you go to the bottom, you’ll see that the menu’s down here.
Customizing Your WordPress Website & Setting Up Your Blog
Now if you go to this page where it says blog, there’s nothing there. So I’m going to show you what to do next. Now, you’re going to go to customize your website. And back here is where you can change the look and feel of some other parts of your website. So you’re going to see this is where you can change the theme, your site identity, and a bunch of other things.
So site identity is going to be like your logo, your WordPress site. So you could call this your blog name and you’ll see it shows up here. If you put your logo in, that’s going to show up up there. And you can put a logo in here or you can remove it. You can add a tagline if you want to put a tagline up here, and there’s all kinds of little things you can do, but say we want to change the look and feel.
We don’t want it to be traditional. Maybe we want it modern. You can see the fonts and the colors will change in here depending on what you choose. So this is plum and this changes. If you look at the fonts, you’ll see that these all change, but you can change the colors. So let’s just say we want to do modern, maybe we want it pink, and you can change all that down here as well.
All the colors, all the menus. You can play around with this, and then you could choose if you want to change out this look and feel, maybe you want the menu to be below your logo and your name. And this is just something to play around with, but maybe you want your menu to be a different color. So you could change your menu to be black, but then you’re going to need to change your text to be white, so you can play around with this.
And then same thing with the footer. If you go down to your footer, which we’re looking at now. And I would go to the homepage to play around with this. But if you go to your footer down here, there’s nothing there. So we, maybe you want to change it to be black too. And same thing with the foreground. Maybe you want this to be that and you, you can change how this is going to look and feel.
And once you add your social media handles in here, you’ll see those show up. So if you go to social, just say that you want to add, you want to add all your handles in here.
You will see that they show up here. And they won’t because we change the color. But if you go down here and you change and you add this little icon in here, and you, it could be any color you want. It could be pink. You can choose this pink color. But once you add all your social handles in here, and that’s not, I’m just adding something random.
But once you put a link in there, then they’ll show up down here and you can save those. And then this is one place you can kind of edit your menus. I don’t edit it from here, but you can edit it from here. And then site settings. So this is another little thing that you can say to display page titles, or you can do just blog excerpts if you just want the excerpts from the blog.
So it’s just a little piece of the blog post instead of the whole thing. And then down here where it says, my WordPress site, you can change this and say, I don’t know, by Blogging Brandi. And that shows up here at the bottom. And then your homepage settings. This is where right now, if you go to the homepage.
It is just set to be our latest posts, but we want it to be a static page, and we’re going to pick the homepage that we just created. And so we’re going to go down and pick the homepage and then down here, remember we didn’t have a blog post page, so now if you go to our blog page, it’s kind of boring. There’s nothing there, but we’re going to select the post page to be our blog, and if it wasn’t here, we could add it.
So now you can see this is. Taking our blog posts and adding it to this page that it’s considering. Our blog page. And then same thing, the WooCommerce you can kind of decide how many products you want to show and product images, sizes, and you can choose all these different things. This is showing you the shop and then if you do any kind of additional coding, but this is showing you what this would look like.
When you change all these things, and so this is how you would customize your website with the colors and the fonts and everything like that, and then you would want to publish these changes, and then you can go look at what your website looks like. And again, it’s not live yet, but this, you can see, it’s starting to come together.
It’s starting to look like a website. The more that you add to it, the more that you customize it. And you haven’t really put anything in here yet. You’ve just kind of put some templates in placeholders. And so this is all saved. I’m going to go outta here and I want to go look at what my website looks like…
Launching Your Blog
So this, you can already see. It still says, come in soon. We’re not. Up and running yet, we can hit launch my site from here, but I just want to show you on the backend. If you’re in your dashboard and you’re like, okay, I like it, I want to publish it, then you can go right here and hit launch my site. Before you do that, I just want you to see there’s so much more that you’re going to customize over here.
It’s just too much for one video. So this is just basically setting up your website and then no matter what you want to do, I’ve got plugins and other things that you can add, and all of that is over at the Born to Blog Club. This is literally step by step how I would set up a website for a client or anyone else that came to me. This is exactly what I would do.
And if you notice, our website still has no name. All we did was set up the website. It’s all there. So now once we choose a name, we can connect it, we can put our social media handles, we can add our blog posts, we can add our pictures, and we can make this look and feel however we want.
I want to go in here and just launch my site just because I want you to see it. So let’s say we launch it and it’s going to say, okay, are you sure you’re ready to launch after your site’s launched? It’s going to be discovered by search engines and available to the world. Now, I would set up my domain name like BloggingBrandi.com and connect those two first.
So you could say not yet, and you’d go back to GoDaddy and it will walk you through, or the process. It’ll say like, oh, don’t you want a domain name? And that will be like back here, how you could get back to your GoDaddy stuff and set up those things. Okay, so let’s say that, that we’ve got everything ready and we’re ready to launch this now.
We’re going to hit launch my site. So we’re going to say Yes, launch my site. It says, great, your site’s live, and it gives us the URL. And then we can view our site here. And this is exactly what, what we just created in a matter of minutes. And then if you want to go to an inco, you can go and see that this is all done.
So you’re going to have to change all this. You’re going to have to write everything and put your pictures in here and update this. So on your contact page? Yeah. It’s here, but it says hello there and it says 5, 5, 5. You’re going to have to put your phone number or your email. So this is just a template. This is all ready for you to go.
Now you can see all your pages. You’ve got your homepage, so you can change this out, change the pictures, make it look and feel the way that you want. Now you’ve got your blog, your shop now. One thing. Okay, so let’s see why this page is not launched. It says store is coming soon. Let’s see what’s going on with that store is coming soon live.
So we’re going to just say we want the store to be live, and this is back here on WooCommerce and it is asking you so you can hide it from your site or coming soon, but if you’re back here on the WooCommerce site visibility tab is where you’re going to turn that on, and then you’ll be able to see your store if you were in a incognito tab, if you go to your shop page that now your store’s there and your products are there.
And so you have all this and it’s a template, but now you’ve gotta set it all up.
Adding Blocks, Patterns, & Custom Features To Pages + Posts
And there’s one other thing I want to show you is whether it’s a post or a page, there’s little features that you can use. So let’s just say that we want to customize a page. So I, this is a post, but whether it’s a post or a page, it allows you to add these.
So right here, if you click this little add block, you can choose these little features and add them in here. So let’s say I’m, I’m typing away and I want to add a title to my blog post. Okay. It’s going to be a header. So I’m going to add a header, a heading, and it’s going to enlarge that for me. So this would be the blog heading.
And then let’s say that I want to add a quote. I could put a quote in here, like, I love to blog. And then this. This is where you’re just going to keep adding. So I’m hitting the little side button. But you can also hit, if you go right here, it’s going to prompt you if you go down. And you hit this little arrow button, you can search for these here, but I’m hitting browse all and then it’s taking me up here and I can search, so like maybe I want to add a table of contents and it’s going to install this plugin to do a table of contents.
But I like putting table of contents in my blog. So I’m just going to say to add a table of contents, which is abbreviated TOC, table of Contents. And so now I can add this into my blog. And it’s coming from this heading that I put up here. So if I put another little subheading in here, it’s going to show up there too.
And so I’m just going to say blog heading too. And you can see it’s just making it right here. This table of contents. And I can move this up and down. I can decide if I want to change the table of contents around, but these are letting me add little features, whether this be a page or a post. There’s different little things that you can add in to here, and these are all coming from little plugins, and so that’s why I say you can customize your little website to be whatever you want with all these little blocks and patterns, and I’ll get into that later.
Today’s Action:
Today’s action is that your blog has to be live and ready to publish. By the time this video ends. Even if it’s not live, at least just have the shell and everything there because I know during this tutorial I’ve talked about, oh, if you don’t have your name picked out or your URL yet, then you might not want to publish and make your blog live yet, but you could at least get the website ready and all of the little things that I showed you and customize your colors and all of that and come back and update that later on, but if you don’t have the blog there, a homepage, an about page, your contact page, you don’t have to make all that pretty. You can just have it there and you can start blogging.
Tomorrow, we’re going to write your first blog post in day four, and yes, I’m going to write it with you step by step. I’m going to show you exactly how to write a blog post and everything that you need to know.
Welcome to my seven day Get Started blogging challenge. If you’ve missed any of these episodes, you need to get caught up. You need rewind. Fast forward, I’ve made an entire playlist. Go through the checklist that I talked about, check everything off so you know you’re doing everything right and come back to the next episode.
That’s going to happen. Tomorrow.
Comment below, let me know what questions you have.
Watch The Full 7 Day Get Started Challenge:
This blog post is part of a series. Be sure to check out the other episodes you may have missed…
- Day 1 – What Blogging Really Is (& Why Most Bloggers Quit)
- Day 2 – What To Blog About (How To Choose A Profitable Blog Niche)
- Day 3 – How To Build Your Blog Website (WordPress Beginner Tutorial)
- Day 4 – How To Write Your First Blog Post
- Day 5 – How to SEO Your Blog Post
- Day 6 – How to Get Your First 100 Blog Readers
- Day 7 – How To Make Money Blogging
If you haven’t already:
Related Reads You Might Also Like…
- How To Start A Blog (Blogging For Beginners)
- How To Create A Blog Website (in 5 minutes) EASY & FAST!
- How To Design A Blog Logo (Easy, Fast & Free!) | Tutorial
- Must-Have WordPress Website Plugins Every Blogger Needs To Install!
Frequently Asked Questions About Starting a WordPress Blog
How much does it cost to start a WordPress blog?
The cost to start a WordPress blog depends on your hosting plan and domain name, but most beginners can launch a blog for under $100 per year.
Here’s a simple breakdown:
- Domain name: $10–$20 per year
- Managed WordPress hosting: $10–$25 per month
- SSL certificate: Often included with hosting
- WordPress software: Free
If you use a provider like GoDaddy Managed WordPress, hosting and security are bundled together, which makes setup easier for beginners.
You can start with the most basic plan and upgrade later as your blog grows. You do NOT need premium themes, paid plugins, or advanced tools when you’re just starting.
Do I need to know coding to build a WordPress blog?
No, you do not need to know any coding to build a WordPress blog.
WordPress uses a visual block editor that allows you to:
- Add text and images
- Insert headings
- Create pages
- Install themes
- Add plugins
All without touching code.
Most beginners can build a fully functioning blog website using drag-and-drop tools, pre-designed themes, and built-in customization settings.
Coding becomes optional only if you want advanced customization later. For launching your first blog, zero technical experience is required.
Can I change my domain name later?
Yes, you can change your domain name later — but it’s easier to choose carefully from the beginning.
If you decide to rebrand your blog, you can:
- Purchase a new domain name
- Connect it to your existing WordPress website
- Set up redirects from the old domain
However, changing your domain name after your blog is established can impact SEO rankings and traffic if not done properly.
If you’re unsure about your blog name right now, you can start with a temporary domain and upgrade once you’re confident. Your WordPress website itself does not have to be rebuilt — only the domain connection changes.
Is WordPress better than Wix or Squarespace for blogging?
For long-term blogging and monetization, WordPress is generally considered the most flexible and scalable platform.
Compared to website builders like Wix and Squarespace, WordPress offers:
- Full ownership of your website
- Thousands of plugins for customization
- More control over SEO
- Easier monetization with ads, affiliates, and digital products
- Greater scalability as your blog grows
Wix and Squarespace are beginner-friendly, but they limit customization and advanced blogging features.
If your goal is to build a serious blog that can grow into a business, WordPress is typically the better long-term choice.
How long does it take to start a WordPress blog?
You can technically set up a WordPress blog in under 30 minutes.
However, designing it, customizing pages, writing content, and branding it may take several days or weeks.
The technical setup is fast. The content creation is what builds the blog.
Do I need hosting to start a WordPress blog?
Yes. If you are using self-hosted WordPress (WordPress.org), you need hosting to store your website files and make your blog accessible online.
Hosting providers like GoDaddy offer Managed WordPress plans that include:
- Hosting
- Security
- SSL certificate
- Automatic updates
Without hosting, your blog cannot go live.
Can I make money with a WordPress blog?
Yes. WordPress blogs can generate income through:
- Affiliate marketing
- Display ads
- Selling digital products
- Offering services
- Sponsored posts
Many full-time bloggers use WordPress because it gives them full monetization control.
👩💻 Feeling Called to Start a Blog? Here’s Exactly How I’d Begin… WATCH THIS FIRST
Join the 7-Day Blogging Challenge
If you’re feeling called to blog, don’t ignore it. Join the Born To Blog Club and start the 7-Day Blogging Challenge. I’ll walk you through it step by step. This is your sign.
#HowToStartABlog #WordPressTutorial #BlogWebsite #BloggingForBeginners #StartABlog #BornToBlogClub
If we haven’t officially met, Hi I’m Blogging Brandi an EX-Corp Kool-Aid Drinker, born to be a blogger, Creator, and Entrepreneur! I also have a Degree in Finance and am a Licensed Cosmetologist. Plus, I LOVE RVing and hanging out with my Dogs ( I have a Cat too!)…